


 Reply With Quote
That bun looks so cool!!
I'll definitely try it! Thanks a lot for posting!


I posted about this style in another thread and someone asked my if there were links to the instructions, but I couldn't find them anymore. So I made my own (or at least, I tried to)
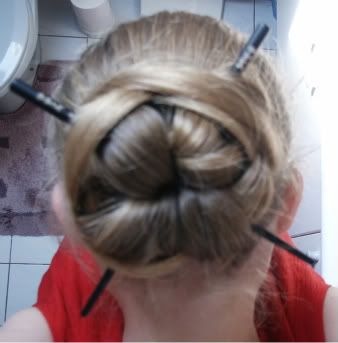
What the style looks like from the back:

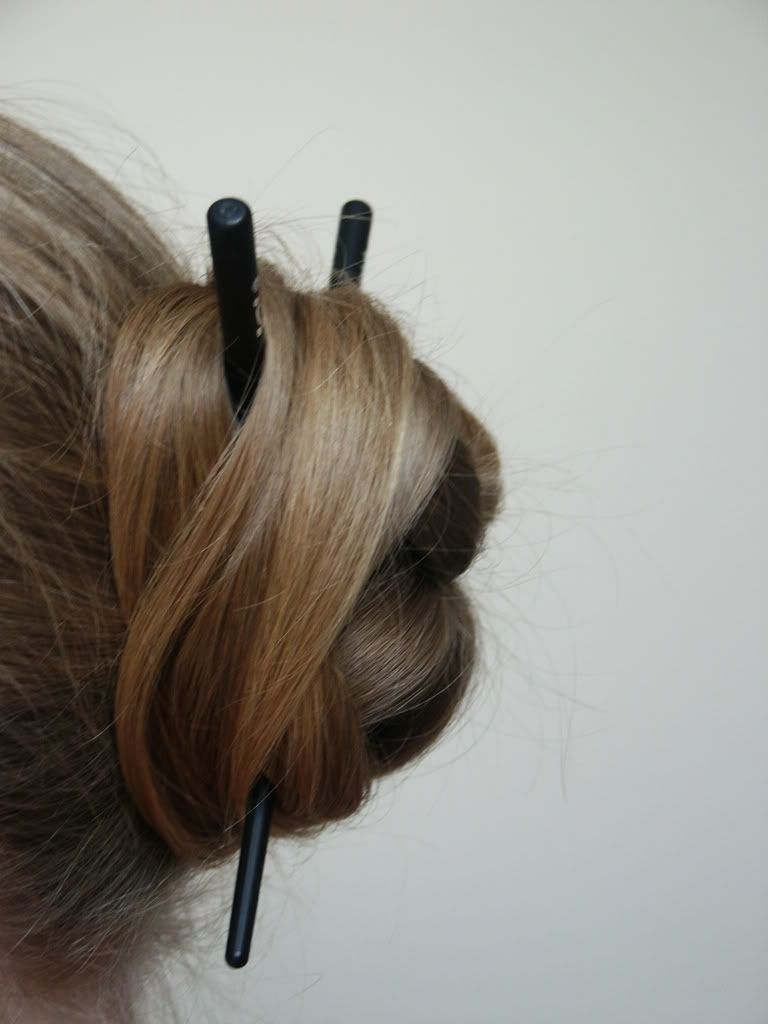
And from the side:
What you need:
- Metal-free hair band
- 2 hairsticks
- Hair pins (whatever you usually use to pin your hair will do)
Instructions:So, the general pattern is: bring the strand under the nearest stick-end (1A, 2B, 3C, 4D), over the next, under-over-under-over-under-over-
- Ponytail your hair and fasten with a metal-free hair band.
- Place the 2 sticks in an X shape (the sticks need to form 90° angles) behind the hair band in your hair.
We will name the 4 ends of the shape X formed by the sticks like this: upper-left is A, lower-left is B, lower-right is C and upper-right is D. The X in the diagram represents the 2 sticks.
AOOOD
OOXOO
BOOOC
- Now, divide your hair in 4 equal-sized sections by first parting the ponytail in a vertical way, like this: l; then parting both halfs horizontally, like this: __. Once you have finished the style, you will see a plus-shape (+) in your bun.
Number the strands: upper-left is 1, lower-left is 2, lower-right is 3, upper-left is 4.
1OlO4
-------
2OlO3
- Now we will start the weaving. Take strand 1 (upper-left) and bring it UNDER point A (again, upper-left), OVER point B, UNDER point C, OVER point D, Repeat this alternating under-over-movement until you run out of hair. Tuck the ends in and pin your first strand in place.
- Pick up strand 2. Bring it under B, over C, under D, over A, Tuck and pin your second strand in place.
- Now pick up strand 3. Bring it under C, over D, under A, over B, Tuck and pin the third strand in place.
- Pick up your last strand. Bring it under D, over A, under B, over C, Tuck and pin the final strand in place.
- Done! Admire your work. Take a pic
If the instructions don't seem to make any sense at first, I suggest you just try it out. When I first saw the original ones, I was a bit confused, but as soon as I tried it, the pieces fell into place
Lady Isilya Nimblefingers of the Flowering Buns in the Order of the Long Haired Knights

That bun looks so cool!!
I'll definitely try it! Thanks a lot for posting!
- "If it weren't for physics and law enforcement, I'd be unstoppable"

Another one I must try!
Lady Lynne of the Unquenchable Spirit in the Order of the Long Haired Knights!

I love the look of this bun and I just wanted to say those were the best written 'do instructions I've ever read! I usually need pictures, but your instructions are perfect!
Thanks for posting!
Avrilon
Thank you girls!
Avrilon, you have no idea how much that means to me. I tried to explain this as detailed as I could and even had someone (--> happylynngilmer) proof read it for me. She added a few more elements too
Lady Isilya Nimblefingers of the Flowering Buns in the Order of the Long Haired Knights

Ooh, I like it, and my hair's just about long enough for it, too!
Lady Nehalennia of the Mirrored-Seas in the Order of the Long-Haired Knights
SL / APL / SBL / MBL / WL / HIP / BCL / TB
JUST proofread! The diagrams were all Lady Isilya! (very good diagrams).I tried to explain this as detailed as I could and even had someone (--> happylynngilmer) proof read it for me. She added a few more elements too
Worse case scenario, it would work as a half-up, too!Ooh, I like it, and my hair's just about long enough for it, too!

Thank you for the instructions! That bun looks amazing, will definitely have to try this
Spot the difference?

That is just BEAUTIFUL!
Mary <><
Matthew 5:14-16

This bun looks gorgeous!
*Pictures* *Rosettebun tutorial*
"The greatness of a nation and its moral progress can be
judged by the way its animals are treated." - Mahatma Gandhi
 Posting Permissions


Bookmarks