


 Reply With Quote
Very pretty! And what a great idea in place of doing all-over color!


I decided to do henna highlights on the under layer of my hair. I've never seen anyone lay out their process for this (and as you'll see, mine got both hilarious and elaborate). Most stuff I've read only talks about all-over color, or mentions highlights in passing with little mention of details. So I thought I'd give it a shot. A few motivations for doing the underlayer...
1. I don't want to commit to dying forever, or until I feel like dealing with years of a slowly descending demarcation line.
2. My hair is extremely layered, and I am now slowly un-layering it by micro-trimming the bottom every couple months. It will show consistently on my bottom layer because of how much longer it is, but if I get tired of it, the henna will be gone shortly after my hair is all evened up.
3. Henna can loosen curl patterns, and I don't want to risk the curls that I just recently found out I have. My under layer is much straighter than the rest of my hair anyway, so less risk.
4. My bottom layer is also the most damaged (mostly mechanical from ripping out tangles). I hope the thickening/sleeking properties of henna will help it stay in decent shape between trims. I'd have to cut a good 2 or 3 inches to get rid of most of the damage, and I don't wanna yet!
Henna for the commitment-phobic, basically.
...Which is still totally permanent, just to be clear. Just... less of a total marriage to it.
I chose bottom sections that are just a tiny bit up from my actual hairline on my neck. Reason for that is so the demarcation line won't be so obvious when my hair is up. It will just sort of make a gradual appearance as it gets closer to where my hair is tied.
I also decided to add one little streak next to my face. Just because.
I was working with dirty hair, due to be washed immediately after I finished all this. Dirty because it's heavier and straighter and that made it easier to section, and I was going to wash the sections anyway to make sure there was nothing on them at all. My clean hair is conditioned with a bit of fenugreek and oil, so it would have a slight coating on it.
First, I mixed up my henna with warm water. I didn't use anything else in it.
I misted my hair with water and combed and detangled it thoroughly. Much more thoroughly than I normally do. I broke it off into 4 sections and tied them so I could dig out my little chunks to highlight without my nefarious hair that gets into everything finding a way into it.
I had one section loose at a time and took 2 chunks of hair from each, trying to have them be kind of irregularly spaced -- I prefer the slightly untidy look.
When the chunks I wanted were out, I tied the rest of the section back up in a bun to keep it out of the way, then moved on to the next section. Then I pulled out the streak by my face.
When all those where done, I took the bulk of my hair out of their little mini-buns and tied them into one big bun, making it as smooth as I could, secured with spin pins on top of my head. I put a shower cap over that, leaving my sections hanging down.
The shower cap may not be ideal if you really want to make sure the henna gets to your roots, but I wasn't concerned about that.
Then I washed the sections with clarifying shampoo (as I did with my test hairs) and let them get about half dry. Not dripping, but still damp. Since they were such little sections, that didn't take long -- by the time I'd done all the sectioning and washed/half-dried the sections, my henna was ready.
It is time!
In what is possibly the weirdest get-up ever, I put a sheet of saran wrap across my back, draped over my shoulders, and another around my neck. But hey, it worked!
I worked the henna into each section, then sort of curled it up and folded it into a piece of saran wrap. Then, I secured the saran wrap by cinching it at the top of the section with a bobby pin. Repeat for each section.
I started this with gloves, but due to the difficulty of trying to manipulate small sections, and then trying to origami bits of saranwrap over them, I quickly became frustrated and just decided to take them off, and leave my tap running a little so I could rinse my finger tips every few seconds (which I needed to do anyway in order to avoid getting henna on top of the saran wrap, and thus all over the hair I don't want to dye, and my neck and face). My fingers weren't that bad at the end -- the slight orange tint came off in a few hours.
Finally, I took off my shower cap and took a long strip of saranwrap (long enough to go around my head completely). Starting at my nape, I wrapped it around my hair line, like I was going to wear it like a pin-up style handkerchief. Folded it onto itself at the top of my head, at the edge of my hairline.
Then, I took another long strip of saran wrap, bent forward, and flipped up the sections up onto the first layer of saranwrap, against my head, wrapping the second layer over it to hold it there.
Then I threw a Turbie Towel over all that mess.
The theory here is that the first layer will somewhat protect my undyed hair if the henna smooshes out, and the second layer flattening it against my head will expose it to some warmth from my scalp, helping the dye release.
Hang out in your weird little 'do for 4 hours.
Then, I put my fashionable saranwrap shawl back on, unwrap my head, put the shower cap back over the bulk of my hair with the sections hanging out, and jumped in the shower.
Unfold the sections and rinse well. I didn't use conditioner for this as many suggest -- since I was working with such small amounts of hair, it was easier to fan it out and just work it out by hand. Instead, I used a tiny bit of my soap nut liquid to wash them once they seemed pretty much rinsed out.
Then, I took off my saranwrap high fashion, my shower cap, and my spin pins, and washed the rest of my hair as normal. I was pretty sure the sections were fully rinsed, but I wasn't super insanely concerned if there was a tiny bit of bleed.
Plopped and air-dried as normal. I oil my ends when they're about half dry, and I used a tiny bit extra this time around, as I have read henna can be a touch drying for some people.
Ta-da! Henna highlights for the commitment-phobic.
And the results?
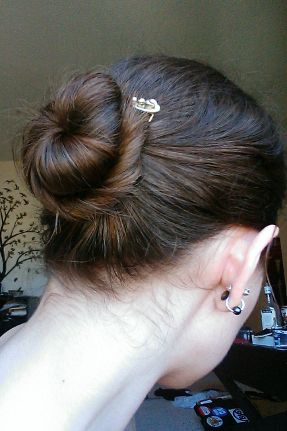
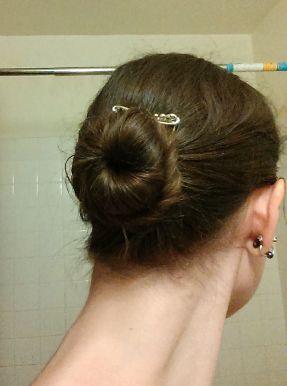
Well, I'm dark-haired. As you'd expect, it's pretty darn subtle especially in artificial light. But I get a nice flash and a swirl in my bun in any degree of sunlight -- even inside, on this slightly overcast day.
Because it's easier to see with my hair up, here's a couple pics. First is in front of a window with good natural light. Second is in my bathroom with artificial light.
My fears were correct; it did strip a bit of my wave. But given that the bulk of my hair -- and certainly most of my curliest hair -- is untouched, that's ok.
At this point, it's a little dry. I have a decent oil application in there in these pics. Hoping that will clear up relatively quickly.
I thought about doing it again, but I don't think I will. I want bright, and more applications will likely just make it darker. Also, I don't want to dry or un-wave my hair any further. And I'm completely unwilling to go anywhere near bleach. So I think I'll leave it. I do think it's a nice little surprise in the sun!
Hope this was useful, or at least amusing, to someone.
Weird fact about the weirdo who typed all this: When pulling the section next to my face, I picked through my hair and intentionally avoided dying the white hair I have up there. I like it. And maybe I'm also a little bit of a contrarian, in a society that still thinks women must dye their gray. What can I say.
Weirder fact: The hairs that look white in the sunlight photo actually aren't. WTH?
Last edited by lilin; September 1st, 2014 at 04:32 PM.

Very pretty! And what a great idea in place of doing all-over color!
Reached classic mid 2014, cut back to hip. Now at tbl and liking the length
Thanks! Glad you like it.I had just never seen anyone lay out their process for anything but ombre or all-over. Hopefully someone else who's done it will chime in. There must be a way to do it without using 10 pounds of saranwrap.
But I've never dyed my hair, so for first times, hey, not bad! I'm not orange all over, and only the bits I wanted to dye, are dyed. Good enough!
Last edited by lilin; September 3rd, 2014 at 04:24 PM.

I love reading all the details.

💖 what brand of henna did you use?

lilin it looks really nice! I was wondering about streaks myself (and may do that instead of ombre for when I grow out my henna) before I went whole-head for scalp reasons.
You should take a pic of the underlayer down!
Light Mountain Red, which is straight henna. I've heard mixed reviews about it, but it was at the co-op and I really think it did a pretty good job considering how dark my hair is. It was fairly easy to wash out too.Originally Posted by EarthArtist

Thanks! I'll give it a try next time I wash it! I wasn't having much luck capturing it that day.

That's awesome, lilin!
You definitely have a great highlights effect going on!
Thank you so much for starting this thread, because I've been wanting to do something like that, but my assumption was that only all-over color or ombre would be visible or doable, so I'm happy to see that it worked in only 4 hours!
How did you manage to bun and saran-wrap all the hair separately from the streaks to be henna-ed? How did you keep the henna from "leaking" to your scalp?
I really love your highlight spacing: did you only use 8 streaks (2 streaks per each of the 4 sections), and were all of the same size?
Sorry for so many questions
I think it's mainly visible with my hair up, because my hair color on my bottom layer is so variable anyway, but for lighter hair I think it would show better down.
I had the hair I wasn't henna'ing up in a bun with spin pins, with the highlighted bits hanging down on the back of my head wrapped in their own little saranwrap cocoons secured with bobby pins to stop it coming undone. I wrapped saranwrap around my bun and all my un-henna'ed hair, then bent forward so the highlighted bits fell forward onto the first layer of saranwrap, and then trapped them there with another layer of saranwrap to keep them close to my head. So a ton of saranwrap, basically! Then I put on the Turbie Twist to keep it all in place.
I didn't get any leaking on the rest of my hair or my Turbie Twist, although the bobby pins did shift down the sections a little bit.
They were kind of variable sizes. I didn't want it to look too neat.
That's really great, lilin!
 Posting Permissions


Bookmarks